

Introduction — Making Heated Gloves Requires Both Textile Craftsmanship and Electronics Engineering
Heat gloves are not a sewn piece of fabric with some kind of heating system attached but rather a complex combination of electronics, heating systems, insulation, waterproofing, and wearable construction which demands accuracy throughout the construction process to maintain safety and effectiveness. I am an engineer at Dr. Warm, where I have over 20 years of experience and oversaw the operation of the heated product lines, as an expert in heating systems, optimized the elements to create a uniform heat, and an OEM advisor who has assisted brands and brands in production, which has made my experience with Dr. Warm in the role of managing runs where one wrong move with the wiring meant the rejection of the batch. It takes a tour of the hot glove manufacturing, starting with the raw materials, as it goes to final testing, during which the engineering is demonstrated to make these gloves dependable for skiing or work. The process of the heated apparel factory brings to light the reason why the quality differs, inexpensive shortcuts cannot withstand cold conditions, whereas the strong constructions provide consistent heat.
Overview of the Heated Glove Manufacturing Process
The manufacturing process of the heated gloves follows an orderly process of the received materials up to the completed products with a combination of traditional glove making accompanied by high-tech integration- here is high level sequence of our production lines where we have streamlined it in terms of efficiency and durability.
Step 1 — Material Selection & Cutting
Fabrics that form the outer shells, insulation and lining are selected and cut according to pattern, and this forms the basis of comfort and protection.
Step 2 — Heating Element Preparation
Carbon fibres, films of graphene, heating wire are modelled and tested to be used in the glove structure.
Step 3 — Wiring & Circuit Assembly
Finger routing, PCB, connectors are used to make sure that the power flows safely and without bulk or breakage.
Step 4 — Glove Shell Sewing & Layer Construction
Palm, back-of-hand shell, padding are stitched with reinforcements to make them more wear-resistant.
Step 5 — Battery Integration & Testing
The power system can be checked during the final assembly stage as well as during the runtime tests.
Step 6 — Waterproofing & Final Assembly
Sealing and finishing make the glove resistant to moisture and everyday use.
Step 1 — Selecting and Cutting the Right Materials
The foundation is material selection, bad decisions will result in bad-fitting or coldness as I experienced in prototypes where thin fabrics could not pass a water test. Our sourcing begins with the use, such as rugged material in work gloves.
Outer Shell Materials
Leather, nylon, softshell, ripstop— leather is used in the outdoor work where it provides grip and softshell suits used in skiing where it is utilized to provide flexibility.
Waterproof Membranes
IPX-rated inserts inserts such as PU coats are used to prevent snow, but this applied prior to cutting so that no seams would be left.
Insulation Selection
Thinsulate, cotton padding, hollow fiber—Thinsulate is a good heat trap that takes minimal space and is best used in tight clothes.
Comfort Lining
Fleece, microfiber—soft to skin, pulls up moisture to avoid clammy.
Explain why layering matters for heat retention: Multiple layers trap air that is generated that surrounds the heat, however, it should not be so thick that it limits the motion of the fingers as too thick and the gloves become rigid in the cold.
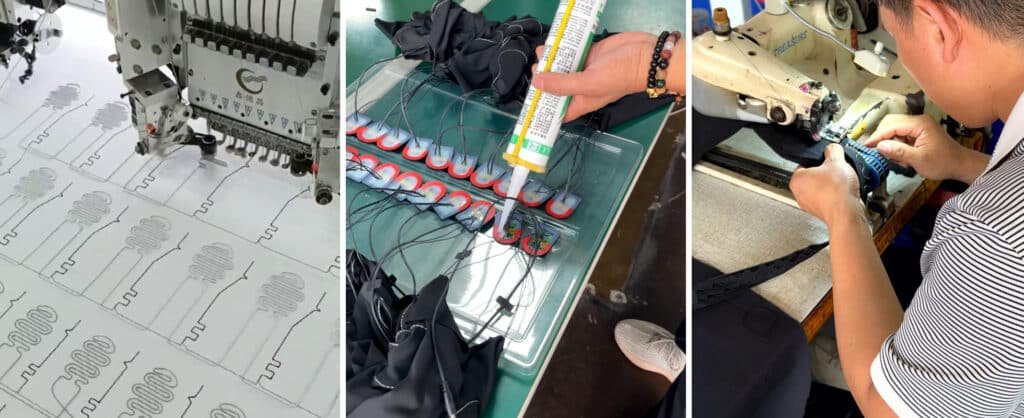
Step 2 — Heating Element Manufacturing
The heating elements are custom-cut, manufacturers of graphene heated gloves tend to use film to evenly cut the elements, but choice is dependent on the type of glove, with wire being economical, with no flex.
Carbon Fiber Heating Elements
Bendable, strong, fingertip-friendly finger friendly strands, which can be cut into figures of fingers, and which heat up to 50 degrees Celsius within 2 minutes, giving a strong grip.
Graphene Heating Film
Ultra-thin, fast heating, uniform heat—0.1mm layers laminated to achieve smooth integration, and effective in energy saving designs.
Heating Wire
Budget option with limitations—coiled nichrome cut to provide basic warmth, however, can cause hotspots unless insulated.
Heating Zone Layout Design
Back of hand, palm, individual fingers—fingers being counted on first since they think of feeling colder, and layout was overlaid on glove shapes.
Cutting, Laminating & Shaping
The components are punched and bonded together in layers, and resistance (5-10 ohms) is checked to maintain stabilized production.
Step 3 — Wiring Route, PCB, and Power System Assembly
Wiring: The wiring of gloves and circuit assemblies is fine, and the 5,000 bends are required to survive, as was the case in our stress tests where bad routes resulted in short circuits at finger joints.
Wiring Route Design
Hidden channels, reinforced bends—embedded down seams to prevent pressure points, silicone-coated wires make them flexible.
PCB Control Board
Manages temperature, voltage, protection—The boards are tiny cuff-mounted chips with a chip that controls the PWM.
Connectors & Sockets
DC plug, magnetic connectors—magnetic to be able to easily charge up without making a clumsy grab in cold.
Safety Features
Overheat protection, short-circuit protection, overcurrent protection—NTC sensors cut at 60C.
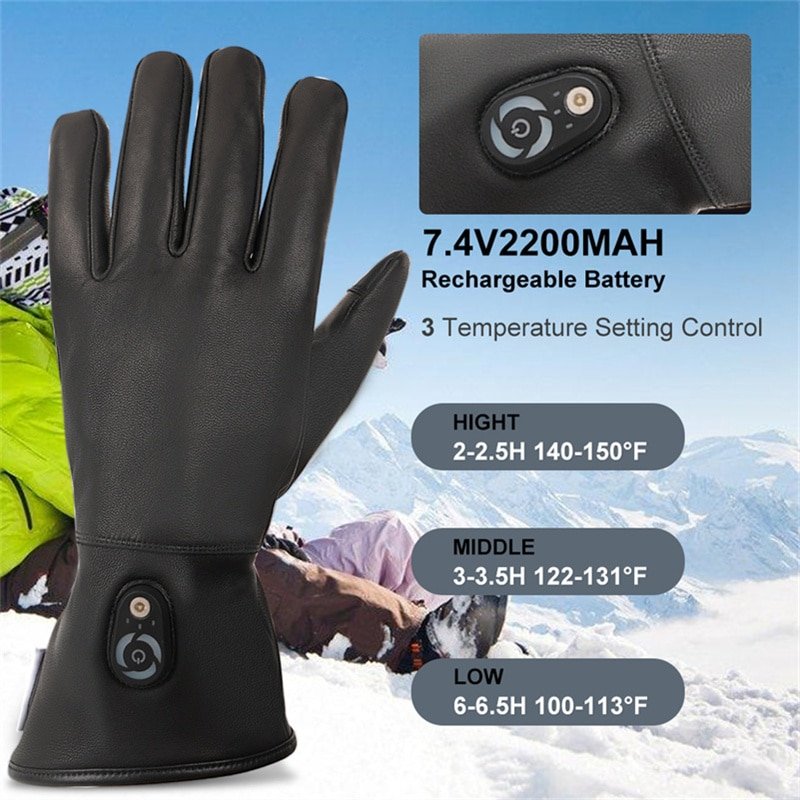
Battery Pack Design
7.4V lithium-ion is the most common—which is compact packs (2000mAh) sewn into cuffs to offer balance.

Step 4 — Sewing, Layering & Constructing the Glove Body
Sewing incorporates technology industrial machines stitch on with accuracy so that the wires do not get poked, because when a batch of my sewing failed, it was because of misalignment.
Assembling Finger Sections
Insert heating elements & wiring—fingers sewn and then brought together.
Stitching Outer Shell + Insulation + Lining
Multi-layer construction—layers that are laid up, aligned and bar-tacked to secure.
Reinforcing Stress Points
Palm grip area, finger joints—which are stitched twice to work with pulls.
Binding & Edge Protection
Guarantees no fraying, and has elastic cuffs to seal.
Step 5 — Battery Installation, Housing & Testing
It is essential to have battery integration- battery insertion in heated gloves incorporates shock resistant casing since falls of work gloves may ruin the packs.
Battery Pocket Construction
Zipped or Velcro-closure pockets—lined to prevent cold drain.
Thermal & Electrical Testing
Heat uniformity, runtime, temperature curve—thermal cameras measure uniformity.
Battery Certification Requirements
UN38.3, CE, FCC, RoHS—obligatory safe export.
Charging & Connection Tests
check plugs and cycles (500+ charges).
Step 6 — Waterproofing & Outer Surface Finishing
Waterproofing will seal it–waterproofed gloves have a 40 per cent failure rate in damp conditions such as snow melt in ski gloves.
Waterproof Membrane Bonding
Insert lamination or sewn-in liners—PU films put on with pressure.
Sealing Needle Holes
Tape or glue to block ingress.
Water-Repellent Coatings
Beading effect DWR beading effect.
Final Exterior Inspection
Check seams, wire exposure and aesthetics.
Step 7 — Quality Control (QC) & Aging Tests
QC identifies flaws- inspection on quality of gloves that are heated is multi-step since interruptions in a run I was in charge of resulted in 15% rejection.
Heating zone consistency test- thermal testing on consistency.
Temperature accuracy test –probes test levels.
Cold chamber test- simulate -20o C runtime.
Waterproof test- immersible under IPX.
Flex simulation: Wiring bending test (30005000 bends).
Battery test- safety- overcharge/short.
Finally check + aging test-24hour defect run.
What Brands Should Focus On During OEM Development
These are the keys to success of brands, when they pay attention to these points: OEM production of heated gloves steps cannot be neglected.
Identical heating zone maps to even heat.
Battery voltage & runtime To match market.
Compliance and safety.
Insulation choices on comfort.
Waterproof use case requirements.
Probably feasible lead times to strike seasons.
Sample PPS Quality gate mass production.
Common Manufacturing Challenges
Issues of complexity- issues that normally arise when designing jackets that are heated apply here as well.
Wiring Breakage During Sewing
Needle punctures- avoid using.
Battery Pocket Misplacement
Poor fit-test ergonomics premature.
Overheating Due to PCB Miscalibration
Wrong logic—calibrate in QC.
Wrong Insulation Thickness Blocking Heat
Excessive thickness snareth–design nearness.
Unstable Heating in Extreme Cold
Battery consumption- cold cells in use.
Final Conclusion — Heated Glove Production Combines Precision, Safety & Skilled Craftsmanship
Fuses textile sewing with electronic integration process The process of assembling heat gloves includes the selection of materials and QC tests to guarantee the warmth and durability. Carbon fiber or graphene components, 7.4 V batteries, and intense inspection of the products are some of the measures that make production provide reliable equipment. By collaborating with factories that have a lot of experience, brands can dodge the pitfalls, and produce products that can work in real cold.